Tutorial: single-host orchestration
This tutorial focuses on orchestrating multiple containers together on a single Docker host as an application stack. For doing so, we will be using the docker-compose tool.
The application we are going to build is a user registration application. The application has two interfaces, one is the user registration form; the other is an overview of all registered users. Information of the registered users will be stored in the MySQL database; while the interfaces are built with PHP.
Throught the tutorial you will learn:
- the docker-compose file
- the usage of the docker-compose tool
Preparation
The docker-compose tool is not immediately available after the Docker engine is installed on Linux. Nevertheless, the installation is very straightforward as it’s just a single binary file to be downloaded. Follow the commands below to install it:
$ sudo curl -L https://github.com/docker/compose/releases/download/1.22.0/docker-compose-$(uname -s)-$(uname -m) \
-o /usr/local/bin/docker-compose
$ chmod +x /usr/local/bin/docker-compose
$ docker-compose --version
Files used in this tutorial are available on GitHub. Preparing those files within the ~/tmp using the commands below:
$ mkdir -p ~/tmp
$ cd ~/tmp
$ wget https://github.com/Donders-Institute/docker-swarm-setup/raw/master/doc/tutorial/centos-httpd/orchestration.tar.gz
$ tar xvzf orchestration.tar.gz
$ cd orchestration
$ ls
app  cleanup.sh  docker-compose.yml  initdb.d
Important
In order to make the following commands in this tutorial work, you also need to prepare the files we used in the Tutorial: basic section.
The docker-compose file
Container orchestration is to manage multiple containers in a controlled manner so that they work together as a set of integrated components. The docker-compose file is to describe the containers and their relationship in the stack. The docker-compose file is also written in YAML. Hereafter is the docker-compose file for our user registration application.
Tip
The filename of the docker-compose file is usually docker-compose.yml as it is the default the docker-compose tool looks up in the directory.
1 2 3 4 5 6 7 8 9 10 11 12 13 14 15 16 17 18 19 20 21 22 23 24 25 26 27 28 29 30 31 32 33 34 | version: '3.1'
networks:
dbnet:
services:
db:
image: mysql:latest
hostname: db
command: --default-authentication-plugin=mysql_native_password
environment:
- MYSQL_ROOT_PASSWORD=admin123
- MYSQL_DATABASE=registry
- MYSQL_USER=demo
- MYSQL_PASSWORD=demo123
volumes:
- ./initdb.d:/docker-entrypoint-initdb.d
- ./data:/var/lib/mysql
networks:
- dbnet
web:
build:
context: ../basic
dockerfile: Dockerfile_php
image: php:centos
volumes:
- ./app:/var/www/html
- ./log:/var/log/httpd
networks:
- dbnet
ports:
- 8080:80
depends_on:
- db
|
The docker-compose file above implements a service architecture shown in Fig. 3 where we have two services (web and db) running in a internal network dbnet created on-demand.
Tip
The docker-compose file starts with the keyword version. It is important to note that keywords of the docker-compose file are supported differently in different Docker versions. Thus, the keyword version is to tell the docker-compose tool which version it has to use for interpreting the entire docker-compose file.
The compatibility table can be found here.
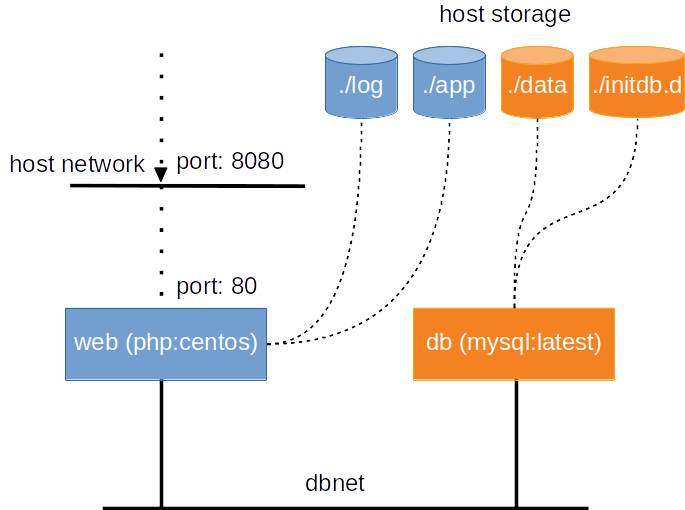
Fig. 3 an illustration of the service architecture implemented by the docker-compose file used in this tutorial.
The service web uses the php:centos image we have built in Tutorial: basic. It has two bind-mounts: one for the application codes (i.e. HTML and PHP files) and the other for making the HTTPd logs persistent on the host. The web service is attached to the dbnet network and has its network port 80 mapped to the port 8080 on the host. Furthermore, it waits for the readiness of the db service before it can be started.
Another service db uses the official MySQL image from the Docker Hub. According to the documentation of this official MySQL image, commands and environment variables are provided for initialising the database for our user registration application.
The db service has two bind-mounted volumes. The ./init.d directory on host is bind-mounted to the /docker-entrypoint-initdb.d directory in the container as we will make use the bootstrap mechanism provided by the container to create a database schema for the registry database; while the ./data is bind-mounted to /var/lib/mysql for preserving the data in the MySQL database. The db service is also joint into the dbnet network so that it becomes accessible to the web service.
Building services
When the service stack has a container based on local image build (e.g. the web service in our example), it is necessary to build the container via the docker-compose tool. For that, one can do:
$ docker-compose build --force-rm
Tip
The command above will loads the docker-compose.yml file in the current directory. If you have a different filename/location for your docker-compose file, add the -f <filepath> option in front of the build command.
Bringing services up
Once the docker-compose file is reasy, bring the whole service stack up is very simple. Just do:
$ docker-compose up -d
Creating network "orchestration_dbnet" with the default driver
Creating orchestration_db_1 ...
Creating orchestration_db_1 ... done
Creating orchestration_web_1 ...
Creating orchestration_web_1 ... done
Let’s check our user registration application by connecting the browser to http://localhost:8080.
service status
$ docker-compose ps
       Name                      Command               State          Ports
-----------------------------------------------------------------------------------
orchestration_db_1    docker-entrypoint.sh --def ...   Up      3306/tcp, 33060/tcp
orchestration_web_1   /run-httpd.sh                    Up      0.0.0.0:8080->80/tcp
service logs
The services may produce logs to its STDOUT/STDERR. Those logs can be monitored using
$ docker-compose logs -f
where the option -f follows the output on STDOUT/STDERR.
Bringing services down
$ docker-compose down
Stopping orchestration_web_1 ...
Stopping orchestration_db_1  ...
Removing orchestration_web_1 ... done
Removing orchestration_db_1  ... done
Removing network orchestration_dbnet
Exercise: HAProxy
In this exercise, you are going to update the docker-compose file to add on top of the web service a HAProxy loadbalancer. The overall architecture looks like the figure below:
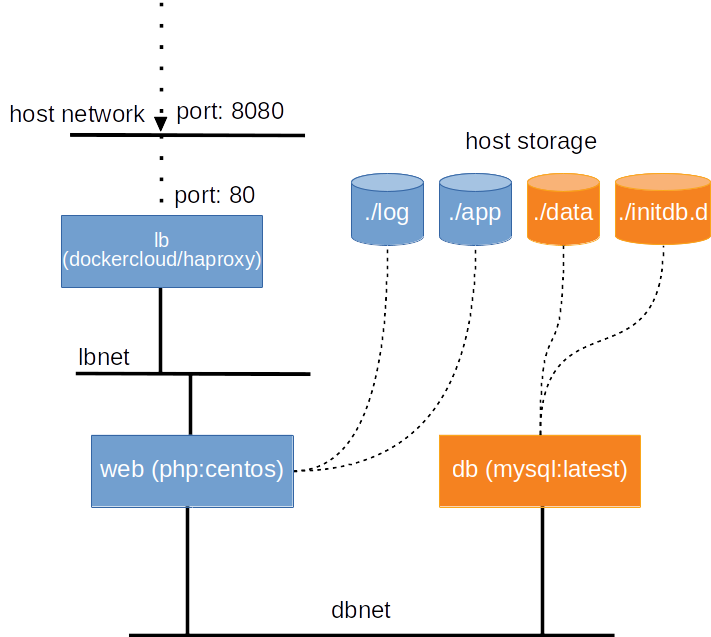
Fig. 4 an illustration of the service architecture with HAProxy as the loadbalancer.
Step 1: add service dockercloud/haproxy
The HAProxy we are going to use is customised by DockerCloud, and is available here. Adding the following service description into the docker-compose.yml file.
1 2 3 4 5 6 7 8 9 10 11 12 | lb:
image: dockercloud/haproxy
volumes:
- /var/run/docker.sock:/var/run/docker.sock
links:
- web
ports:
- 8080:80
depends_on:
- web
networks:
- lbnet
|
Tip
In real-world situation, it is very often to use existing container images from the Docker Hub. It is a good practise to read the usage of the container image before using it.
Step 2: adjust web service
Task 1
From the documentation of the dockercloud/haproxy, it requires services attached to the proxy to set an environment variable SERVICE_PORT. The SERVICE_PORT of the web service is 80.
Could you modify the docker-compose file accordingly for it?
Task 2
Instead of mapping host port 8080 to container port 80, we just need to join the web service into the network of the loadbalancer.
Could you modify the docker-compose file accordingly for it?
Step 3: add lbnet network
We have made use of the network lbnet; but we haven’t ask the docker-compose to create it.
Could you modify the docker-compose file accordingly so that the network lbnet is created when bring up the services?
Service scaling
The final docker-compose file is available here.
Save the file as docker-compose.lb.yml in the ~/tmp/orchestration directory; and do the following to start the services:
$ docker-compose -f docker-compose.lb.yml build --force-rm
$ docker-compose -f docker-compose.lb.yml up
Try connecting to http://localhost:8080. You should see the same user registration application. The difference is that we are now accessing the web service through the HAProxy.
With this setting, we can now scale up the web service whenever there is a load. For example, to create 2 loadbalancing instances of the web service, one does:
$ docker-compose -f docker-compose.lb.yml scale web=2
Check the running processes with
$ docker-compose -f docker-compose.lb.yml ps
       Name                      Command               State                   Ports
----------------------------------------------------------------------------------------------------
orchestration_db_1    docker-entrypoint.sh --def ...   Up      3306/tcp, 33060/tcp
orchestration_lb_1    /sbin/tini -- dockercloud- ...   Up      1936/tcp, 443/tcp,0.0.0.0:8080->80/tcp
orchestration_web_1   /run-httpd.sh                    Up      80/tcp
orchestration_web_2   /run-httpd.sh                    Up      80/tcp
You should see two web services running on port 80. You could try the followng curl command to check whether the loadbalancer does its job well:
$ for i in {1..10}; do curl http://localhost:8080 2>/dev/null \
| grep 'Served by host'; done