Tutorial: basic
This tutorial is based on an example of building and running a container of the Apache HTTPd server which serves a simple PHP-based helloworld application. Throught the tutorial you will learn:
- the docker workflow and basic UI commands,
- network port mapping,
- data persistency
Preparation
Files used in this tutorial are available on GitHub. Preparing those files within the ~/tmp using the commands below:
$ mkdir -p ~/tmp
$ cd ~/tmp
$ wget https://github.com/Donders-Institute/docker-swarm-setup/raw/master/doc/tutorial/centos-httpd/basic.tar.gz
$ tar xvzf basic.tar.gz
$ cd basic
$ ls
Dockerfile  Dockerfile_php  htmldoc  run-httpd.sh
The Dockerfile
Before starting a container with Docker, we need a docker container image that is either pulled from a image registry (a.k.a. docker registry), such as the Docker Hub, or built by ourselves. In this exercise, we are going to build a container image ourselves.
For building a docker image, one starts with writing an instruction file known as the Dockerfile.
Dockerfile is a YAML document describing how a docker container should be built. Hereafter is an example of the Dockerfile for an Apache HTTPd image:
1 2 3 4 5 6 7 8 9 10 11 12 13 14 15 16 17 18 | FROM centos:7
MAINTAINER The CentOS Project <cloud-ops@centos.org>
LABEL Vendor="CentOS" \
License=GPLv2 \
Version=2.4.6-40
RUN yum -y --setopt=tsflags=nodocs update && \
yum -y --setopt=tsflags=nodocs install httpd && \
yum clean all
EXPOSE 80
# Simple startup script to avoid some issues observed with container restart
ADD run-httpd.sh /run-httpd.sh
RUN chmod -v +x /run-httpd.sh
CMD ["/run-httpd.sh"]
|
The Dockerfile above is explained below.
Each line of the Dockerfile is taken as a step of the build. It started with a keyword followed by argument(s).
Line 1: all container images are built from a basis image. This is indicated by the FROM keyword. In this example, the basis image is the official CentOS 7 image from the Docker Hub.
Line 2-3: a container image can be created with metadata. For instance, the MAINTAINER and LABEL attributes are provided in the example.
Line 8-10: given that we want to build a image for running the Apache HTTPd server, we uses the YUM package manager to install the httpd package within the container. It is done by using the RUN keyword followed by the actual YUM command.
Line 12: we know that the HTTPd service will run on port number 80, we expose that port explicitly for the connectivity.
Line 14: comments in Dockerfile are started with the #.
Line 15: the run-httpd.sh is a script for bootstraping the HTTPd service. It is the main program to be executed after the container is started. In order to make this script available in the image, we use the ADD keyword here. The example here can be interpreted as copying the file “run-httpd.sh” on the host to file “/run-http.sh” in the container image.
Line 16: here we make the bootstrap script in the container image executable so that it can be run directly. It is done using the RUN keyword again.
Line 18: the keyword CMD specifies the command to be executed when the container is started. Here we simply run the bootstrap script we have just copied into the container.
Building the container image
With the Dockerfile in place, we can proceed for building the container image. Make sure you are in the basic folder, and run the following command:
$ docker build -t httpd:centos .
Here we give the image a name:tag with the -t option. With that, the image can be later referred by httpd:centos.
Keep your eyes on the output of the build process. You will find the steps in the Dockerfile are executed sequencially, and some output (e.g. the output from yum install) looks like as if you are running in a CentOS7 system.
What interesting to notice are lines with hash strings. For example:
---> 5182e96772bf
Step 2/8 : MAINTAINER The CentOS Project <cloud-ops@centos.org>
---> Running in 52daee99ca6c
Removing intermediate container 52daee99ca6c
---> cf9a7fe73efc
Image layers
During the build process, each step in the Dockerfile triggers creation of two image layers. One intermediate layer for executing the step; the other is a persistent layer containing results of the step. Those layers are indicated by the hash strings we see in the output snippet above.
The intermediate layer is forked from the persistent layer of the previous step, except for the first step on which the persistent image is always from an existing image built somewhere else (a reason that we always see keyword FROM as the first step in the Dockerfile). The intermediate layer is removed after the execution of the step.
Each persistent layer only consists of the “delta” to the one from its previous step. As illustrated in Fig. 2, the final image is then constructed as a stack of those persisten layers; and it is locked for read-only.
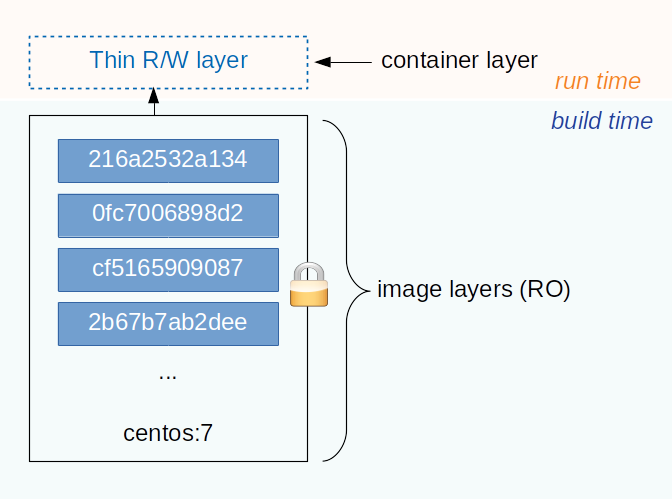
Fig. 2 an illustration of the Docker image and container layers. This figure is inspired by the one on the Docker document.
Persistent layers are reused when they are encountered in different/independent build processes. For example, the persistent layer created by the first step (FROM centos:7) is very likely to be reused for building a variety of container images based on CentOS 7. In this case, Docker will reuse the image downloaded before instead of duplicating it for using the host’s storage efficiently.
The image layers of a final docker image can be examinated by the docker history <image name:tag> command. For example,
$ docker history httpd:centos
Running the container
With the image built successfully, we can now start a container with the image using the docker run [options] <image name:tag> command. For example,
$ docker run --rm -d -p 8080:80 --name myhttpd httpd:centos
Let’s connect the browser to the URL http://localhost:8080. You will see a default welcome page of the Apache HTTPd server.
A few options are used here:
Option --rm instructs Docker to remove the container layer (see below) when the container is stopped.
Option -d instructs Docker to run the container in a detached mode.
Option -p instructs Docker to map the host’s network port 8080 to the container’s network port 80 so that this service is accessible from the host’s external network.
Option --name names the container so that the container can be later referred easily.
Container layer
When running the container from a image, Docker creates a new writable layer (a.k.a. container layer) on top of the image layers. Changes made within the container are delta to the image layers and kept in this container layer. In this way, Docker makes the image layers read-only; and thus can be used by multiple independent containers without interference.
Note
In fact, the way Docker organise deltas in the image layers and the container layer is similar to how the Linux life CD manages the filesystems. They are both based on a stackable filesystem with the Copy-on-Write (CoW) strategy.
The concept of the image layers and the container layer is illustrated in Fig. 2.
Exercise: PHP with MySQL support
Can you extend/modify the Dockerfile and build a image called php:centos? In this image, we want to add PHP with MySQL support to the Apache HTTPd server.
The container should be started with
$ docker run --rm -d -p 8080:80 --name myphp php:centos
Hint
In a CentOS system, one can just run yum -y install php php-mysql to add PHP with MySQL support to the Apache HTTPd server.
To verify the PHP support, you can create a file /var/www/html/index.php in the container, and visit the page http://localhost:8080/index.php. Hereafter is an example:
$ docker exec -it myphp bash
$ cat > /var/www/html/index.php <<EOF
<?php phpinfo(); ?>
EOF
Network port mapping
Networkk port mapping is the way of making the container service accessible to the network of the host.
In the Dockerfile example above, we explicitly expose the port 80 as we know that the HTTPd will listen on this TCP port.
However, the container runs in an internal virtual network, meaning that our HTTPd service is not accessible from the network on which the host is running.
To make the service accessible externally, one uses the -p option to map the host’s port to the container’s port. For instance, the option -p 8080:80 implies that if the client connects to the port 8080 of the host, the connection will be redirected to the port 80 of the container.
Exercise: network
How do you make the HTTPd container accessible on port 80?
Data persistency
The default welcome page of the Apache HTTPd is boring. We are going to create our own homepage.
Let’s access to the bash shell of the running httpd container:
$ docker exec -it myphp bash
In Apache HTTPd, the way to replace the default homepage is creating our own index.html file within the folder /var/www/html. For example, using the command below to create a HTML form in /var/www/html/index.html:
$ cat > /var/www/html/index.html <<EOF
<html>
<head></head>
<body>
<h2>Welcome to my first HTML page served by Docker</h2>
<form action="hello.php" method="POST">
    Your name: <input type="text" name="name"></br>
    Your email: <input type="text" name="email"></br>
<input value="submit" name="submit" type="submit">
</form>
</body>
</html>
EOF
If you revisit the page http://localhost:8080/index.html, you will see the new homepage we just created.
Now imaging that we have to restart the container for a reason. For that, we do:
$ docker stop myphp
$ docker run --rm -d -p 8080:80 --name myphp php:centos
Try connect to the page http://localhost:8080/index.html again with the browser. Do you see the homepage we just added to the container?
Hint
Changes made in the container are stored in the container layer which is only available during the container’s lifetime. When you stop the container, the container layer is removed from the host and thus the data in this layer is NOT persistent.
Volumes
One way to persistent container data is using the so-called volumes. Volumes is managed by Docker and thus it is more portable and manageable.
For the example above, we could create a volume in Docker as
$ docker volume create htmldoc
Hint
One could use docker volume ls and docker volume inspect to list and inspect detail of a Docker volume.
When the volume is available, one could map the volume into the container’s path /var/www/html, using the -v option (i.e. line 3 of the command block below) at the time of starting the container.
1 2 3 4 | $ docker stop myphp
$ docker run --rm -d -p 8080:80 \
-v htmldoc:/var/www/html \
--name myphp php:centos
|
Now get into the shell of the container, and create our own index.html again:
$ docker exec -it myphp bash
$ cat > /var/www/html/index.html <<EOF
<html>
<head></head>
<body>
<h2>Welcome to my first HTML page served by Docker</h2>
<form action="hello.php" method="POST">
    Your name: <input type="text" name="name"></br>
    Your email: <input type="text" name="email"></br>
<input value="submit" name="submit" type="submit">
</form>
</body>
</html>
EOF
$ exit
Check if the new index.html is in place by reloading the page http://localhost:8080/index.html.
Restart the container again:
$ docker stop myphp
$ docker run -rm -d -p 8080:80 \
-v htmldoc:/var/www/html \
--name myphp php:centos
You should see that our own index.html page is still available after restarting the container.
If you want to start from the scratch without any container data, one can simply remove the volume followed by creating a new one.
$ docker volume rm htmldoc
$ docker volume create htmldoc
Bind mounts
Bind mount is another way of keeping container data persistent by binding host’s filesystem structure into the container.
In the files you downloaded to the host you are working on, there is a directory called htmldoc. In this directory, we have prepared our index.html file.
$ ls ~/tmp/basic/htmldoc
hello.php index.html
By binding the directory ~/basic/htmldoc into the container’s /var/www/html directory, the index.html file will appear as /var/www/html/index.html in the container. This is done by the following command at the time of starting the container:
1 2 3 4 | $ docker stop myphp
$ docker run --rm -d -p 8080:80 \
-v ~/tmp/basic/htmldoc:/var/www/html \
--name myphp php:centos
|
Hint
While doing the bind mounts in the container, the benefit is that one can change the files on the host and the changes will take effect right in the container. In addition, if new files are created in the container, they will also appear on the host.
Exercise: preserving HTTPd’s log files
We know that the log files of the Apache HTTPd server are located in /var/log/httpd. How do you make those log files persistent?